How to Fix Hole in Subwoofer (Complete Solutions)
The world of sound is unimaginably complex and be it watching your favorite movies or listening to some soothing music, you’ll want to be armed with a sound system that can give the best experience. But this comes to halt if your subwoofer has developed a hole in it. The good news is that you can mend it with a few handy tools at a drop of a hat.
Sounds come with high as well as low frequencies but it’s not the job of the loudspeakers to reproduce the frequencies from pipe organs, kick drums, or other sounds in movies. You will hear the sounds but you won’t be able to feel them. But this is where the role of subwoofers comes in.
But the real trouble comes when the speaker cone is damaged or you have punched a hole in the subwoofer as it can muddle the sound quality. And if you are trying to find out how to fix a hole in the subwoofer, you have come to the right place. But first, it’s important to know what the different types of subwoofers are.
|
Ported subwoofer |
This type of subwoofer comes with additional holes or ports which allow air to go out. This, in turn, boosts the bass level for producing a thick and rich sound. |
|
Sealed cabinet |
This type of subwoofer comes with an entirely sealed cabinet without any ports. This creates a well-rounded sound quality with lesser peaks and booms.
|
|
Passive radiator |
It consists of two passive radiators which do not remain wired to the amplifier rather than a port and produces sound with a higher range.
|
|
Horn-loaded |
This kind of subwoofer uses the sound which spreads and leaks in several directions via a longhorn speaker for creating a clear loud sound.
|
How To Fix a Hole in A Subwoofer Cone
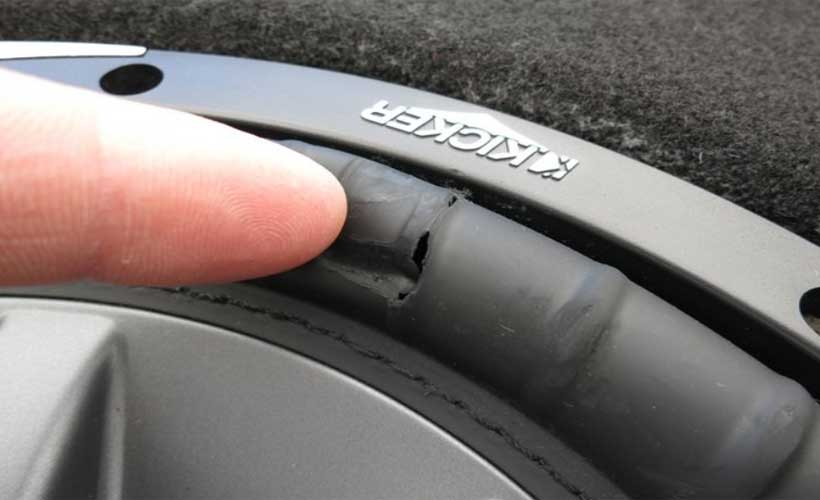
The good news is that you can repair the subwoofer surround without having to take it to an expert. You have to access the damage in the first place and unscrew the car subwoofer.
The damage can be at any part of the subwoofer – it could be the private area within the internal wiring or in the rubber in the area of the sound wheel.
This hole may crop up due to a host of reasons. Let’s take a look at the step-by-step guide on how to fix holes in the subwoofer.
1. Things You Will Require
Some of the basic tools you will require for subwoofer surround repair include a pry tool, screwdrivers, a wire cutter, a clean lint-free cloth, and nitrile latex or RTV silicon.
All these tools are vital to the quick and effective repair of the hole in the subwoofer. If you don’t have any of these tools, you can easily get them online or from local hardware stores.
2. Detect The Hole or Damage in The Subwoofer
Needless to say, the first step to repair is identifying what you need to repair. This step is critical to judging the breach and spotting the precise location where the hole is present.
The size and severity of the hole will also tell you whether you need to use RTV only or some other equipment as well. You can go for an RTV silicon if the entire chunk is gone.
3. Unscrew The Screw on The Wheels
Once you could spot the hole in the subwoofer, you have to remove the screws present on the subwoofer wheel.
You must go for a flat screwdriver for the purpose so that it doesn’t form any sort of chunk or hole in the subwoofer.
A cordless driver can prevent accidents while removing the hole so that you don’t end up bringing more damage to the rubber. You have to practice extreme caution while performing this step.
4. Hold And Lift the Subwoofer
With a flat pry tool, you have to hold and lift the subwoofer with a lot of care. A pry tool makes it easier to lift the wheel of the car subwoofer.
Once you lift it, you have to place your fingers beneath the rubber wheel cautiously and hold it firmly using your fingers.
You shouldn’t place your fingers on the center but rather on the border of the rubber wheel. Next, you have to manage the wires so that there is no disturbance while repairing the hole.
5. Clean The Affected Area
When wondering how to fix a hole in a subwoofer cone, cleaning is an indispensable part. For this, you will require fiber cloth devoid of lint.
With this, you can make sure that the fibers or thread won’t get stuck on the wheel. You have to thoroughly clean the rubber wheel and subwoofer rubber by moving your fingers in specific directions.
Finally, you have to lift the hole and clear the vent from an upward and inward direction. You have to clean the mess in such a way that the insides are also clean. By doing this, you will have a clear view of the hole and the damage it has created.
6. Use A Cotton Swab to Apply Rtv Silicon
Although you will require a cotton swab for applying the silicon, it’s better to remove the cotton since the fibers might get stuck in the hole.
Next, you have to dip the stick in the RTV silicon and apply it precisely on the affected part. Make sure you move the stick in the direction of the repair.
There is no need to fill the void with the RTV silicon. You don’t have to overload it with RTV silicon – just a thin layer is adequate to fill the hole.
If you have to repair the subwoofer surround insides, then you have to make use of your fingertips for the purpose.
Make sure you wear fine gloves to save your skin from any damage. You have to move the fingers and rub the silicone in such a way so that the damaged area is covered smoothly.
Again, you don’t have to go overboard in mending the hole. Only a delicate layer is all that you will require for covering the whole damage perfectly.
7. Push With Accurate Force and Attention
This final step is extremely important yet risky. You have to be very careful while performing this step or else, you might open the hole and create more damage.
That’s why complete attention along with calculated force is needed to push the subwoofer wheel. This will help in strengthening the joint and ensuring that the RTV silicon is suitably attached.
Also, it will help you determine whether the silicon will affect the functioning of the subwoofer.
Lastly, you have to ensure that no light can make its way through the hole. For this, you have to place the flashlight beneath the damaged hole and see if any light is coming.
If you cannot spot any direct light, it shows that the repair is successful and the hole is completely fixed with the silicone.
Final Words
A subwoofer is a critical component for people who can’t do without music in the car. Moreover, it’s used regularly which makes it essential to ensure proper maintenance of the device.
Sometimes, the bass also makes poor noise indicating that there is some issue in the cone. Once you learn how to fix a hole in a subwoofer cone using these step-by-step guides, you can get the job done yourself.
While some people prefer changing the cone rubber entirely, mending with RTV silicon gives a quick and viable fix to the problem.